All content provided herein our website, hyperlinked sites, associated applications, telegram groups, social media accounts and other platforms is for your general information only. We make no warranties of any kind in relation to our content, including but not limited to accuracy and updatedness.
Referral links may be included on any outbound link.
No part of the content that we provide constitutes financial advice, legal advice or any other form of advice meant for your specific reliance for any purpose.
Any use or reliance on our content is solely at your own risk and discretion.
The author takes no responsibility or liability for any investments, profits, or lsoses you may incur or have incurred as a result of this information.
You should conduct your own research, review, analyse and verify our content before relying on them. DeFI cryptocurrency dApps are a highly risky activity that can lead to major losses, therefore consult your financial advisor before making any decision. No content on our Site is meant to be a solicitation or offer.
#
Getting started with MetaMask
MetaMask is a popular cryptocurrency wallet application available in web browsers and on mobile devices that allows you to manage your private BSC keys.
In this way, it serves as a wallet for BNB and other tokens, and allows you to interact with decentralized applications, or dApps.
#
How to install MetaMask
Choose one of the web browsers and follow the instructions to install the MetaMask extension.
Do not download MetaMask from anywhere other than the official stores linked below.
- Visit https://metamask.io/
- Hit "Download" in the menu bar.
- Click “Install MetaMask for Chrome”. You will be directed to the Chrome Web Store.
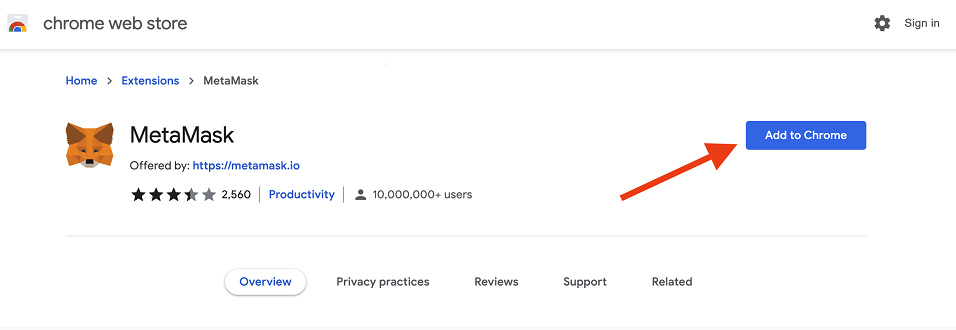
- Click “Add to Chrome”.
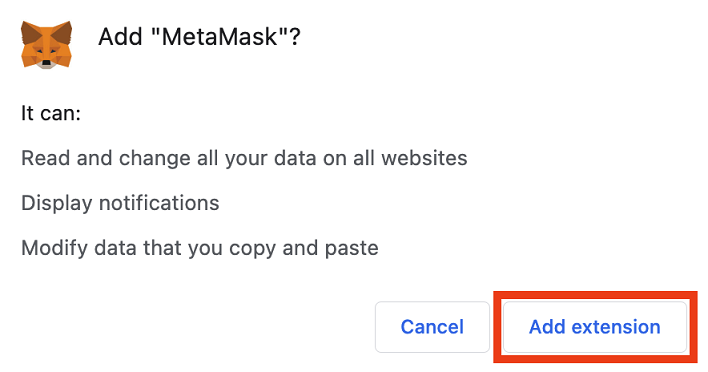
- On the pop up, click “Add extension”.
After you add the MetaMask extension, MetaMask will open automatically. You can also make it easily accessible in your toolbar by clicking the puzzle icon at the top right of the screen and then clicking the pin icon.
- Visit https://metamask.io/
- Click on "Download"
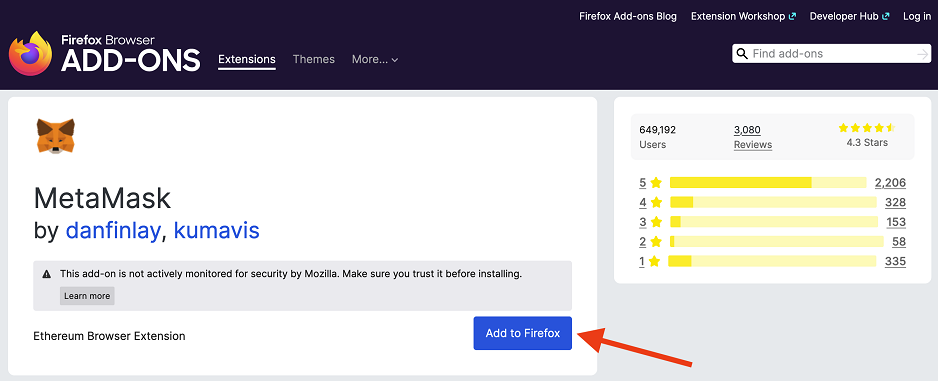
- Hit "Install MetaMask for Firefox".
- In the new window that opens, click on "Add to Firefox"
- On the pop up, click “Add”
NOTE: Do not be alarmed by the fact that the Firefox plugin is listed as published by "danfinlay, kumavis" - these are some of the main players behind MetaMask!
After adding MetaMask Extension, you’ll return to your browser page. MetaMask will appear on your browser; click on it to open MetaMask.
- Visit https://metamask.io/
- Click on "Download".
- Hit "Install MetaMask for Edge".
- Click on the Edge icon, and follow the prompts in the window that opens to install the extension.
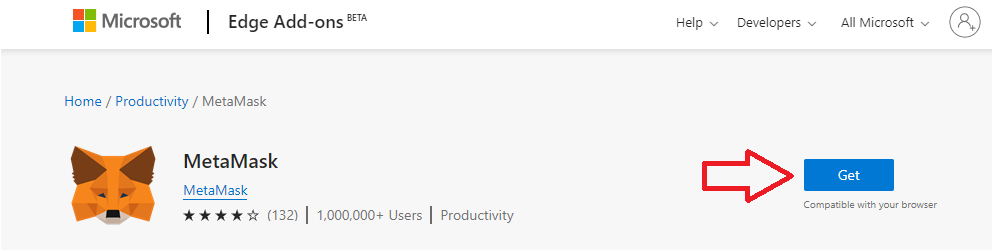
After adding MetaMask Extension, you’ll return to your browser page. MetaMask will appear on your browser. You may click on it to open MetaMask.
- Visit https://metamask.io/
- Click “Download".
- Click on "Install MetaMask for Chrome". Ignore the alarm bells that are ringing: the reason it says "Chrome" here is because Brave is a Chromium-based browser and shares the Web Store with Chrome itself.
- In the Chrome Store that opens, click 'Add to Brave'.
- In the popup that appears, click 'Add extension'.
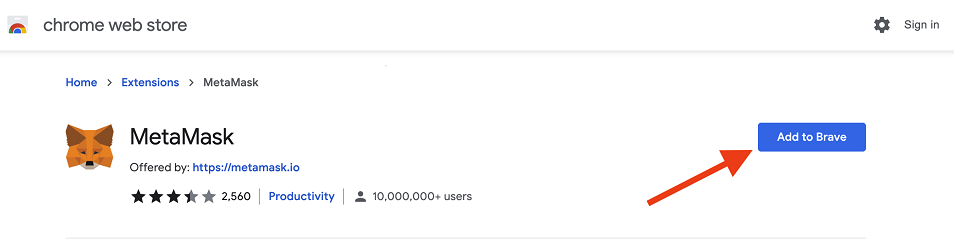
After adding MetaMask Extension, you’ll return to your browser page. MetaMask will appear on your browser. You may click on it to open MetaMask.
Alternatively, you could also access each browser's extension store and search for MetaMask.
#
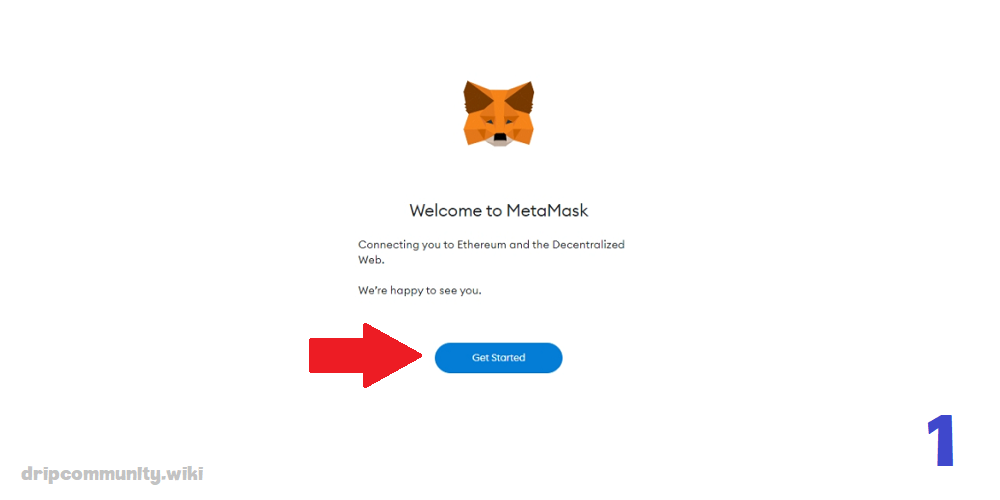
How to create a Wallet
A step-by-step walkthrough for setting up your new MetaMask crypto-wallet.
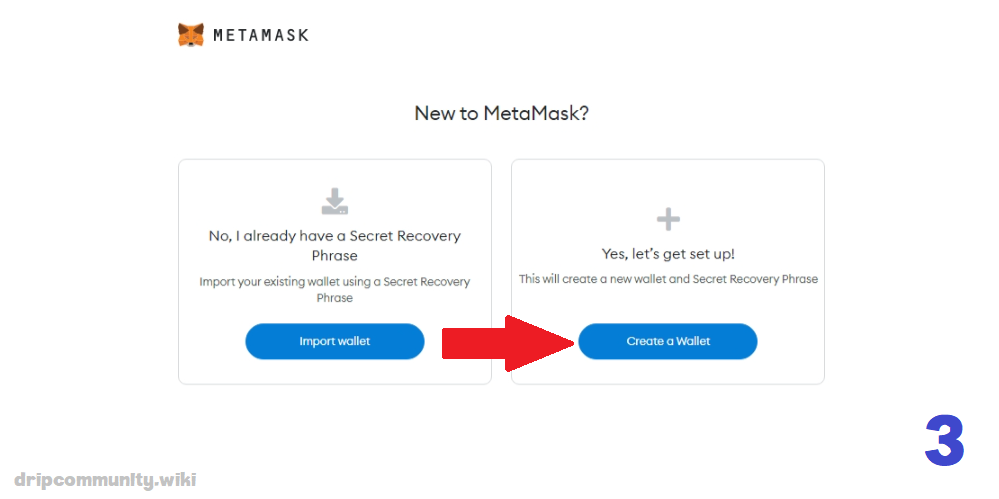
- Once the extension/app is successfully installed, press the "Get Started" option.
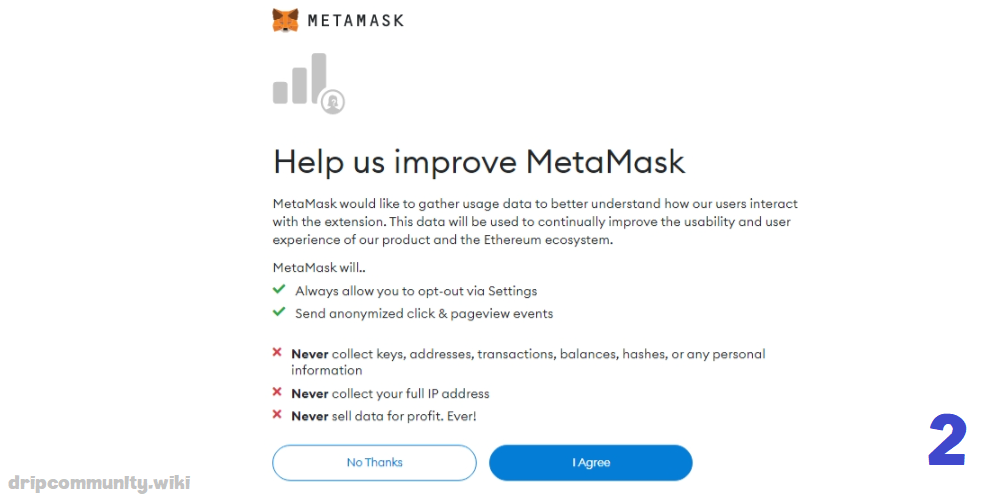
- Click "I Agree" if you’re comfortable with MetaMask using your usage data to better their application. If not, click "No Thanks".
- Click on "Create a Wallet" to create a new one, you can either import an existent wallet using the seed phrase.
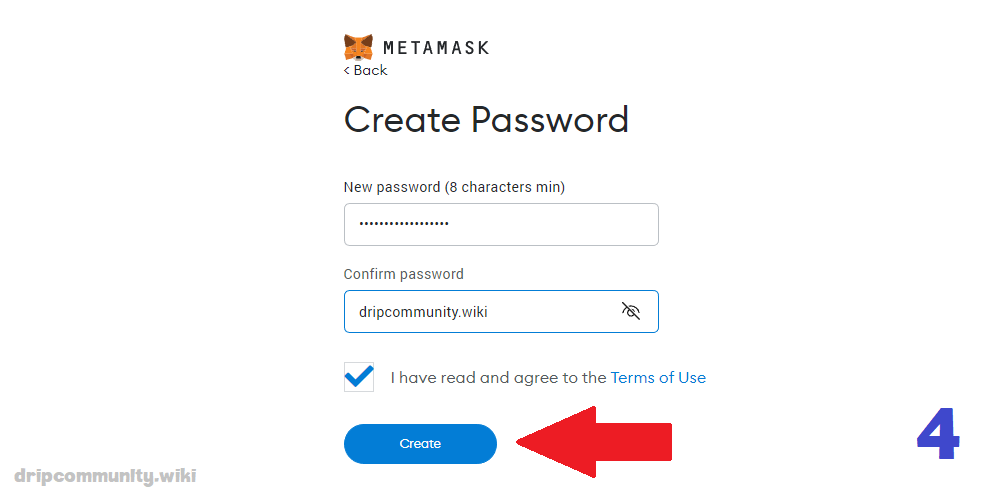
- Next, it will take you to password creation.
For security reasons, you should create a completely original password made with a combination of letters, numbers and symbols.
Create your password, agree to the Terms of Use, and hit Create. You’ll be using this password when you are prompted by MetaMask or a dapp to log in to MetaMask.
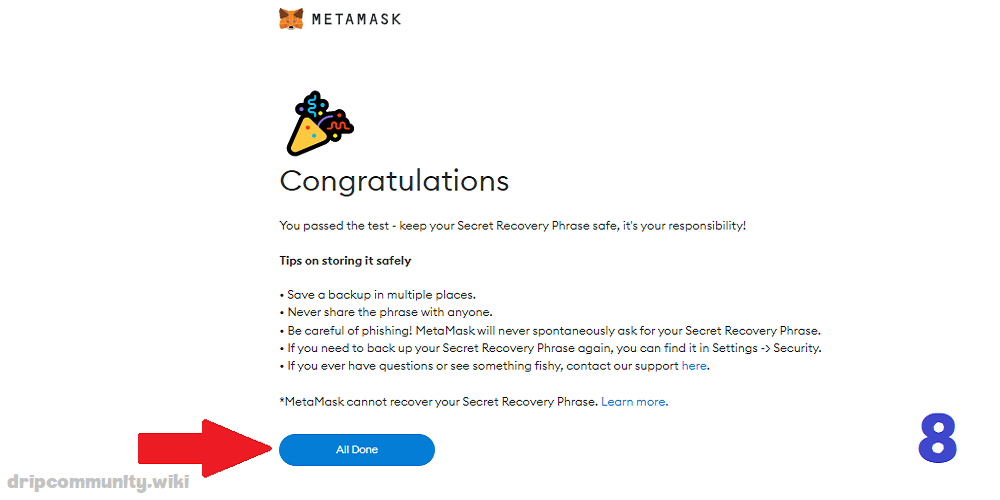
- Watch this short video to learn about your Secret Recovery Phrase and how to keep your new crypto-wallet safe.
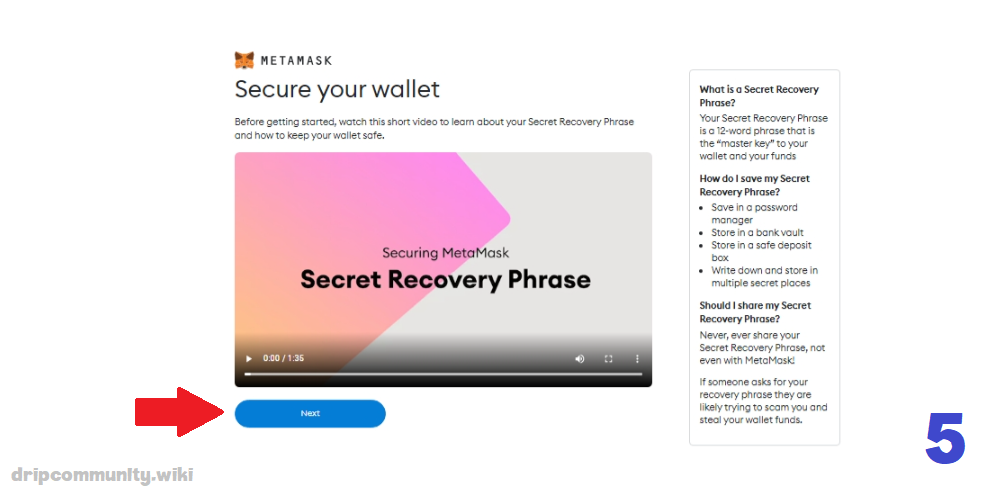
Your Secret Recovery Phrase (SRP) is a unique 12-word phrase that is generated when you first set up MetaMask. Your funds are connected to that phrase. If you ever lose your password, your SRP allows you to recover your wallet and your funds.
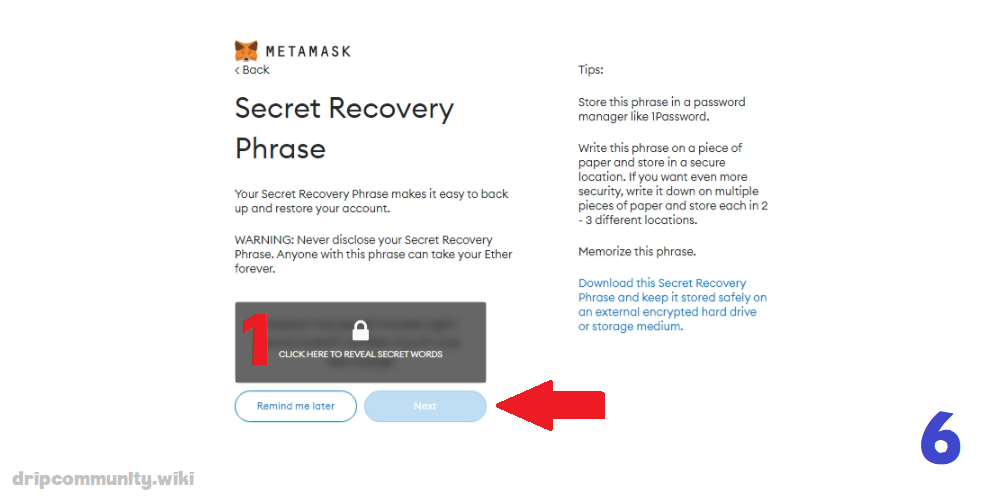
Click Reveal Secret Words.
There you will see a 12 words seed phrase, write it down on paper and hide it somewhere, put it in a safety deposit box, or use a secure password manager.
Storing your SRP in a physical, offline format, eliminates the risk of hacking.
- You’ll be asked to confirm your secret phrase in the correct order.

- Your MetaMask wallet has been set up successfully.
You can now access your wallet by clicking on the MetaMask icon at the top-right-end corner of your browser.
#
How to connect MetaMask to BNB Smart Chain
Drip Community and Animal Farm protocols are based on through the Binance Smart Chain.
Read the step-by-step guide and learn how to connect MetaMask to the Binance Smart Chain.
Click on "Ethereum Mainnet" in the upper right corner, next press the "Add Network" button.
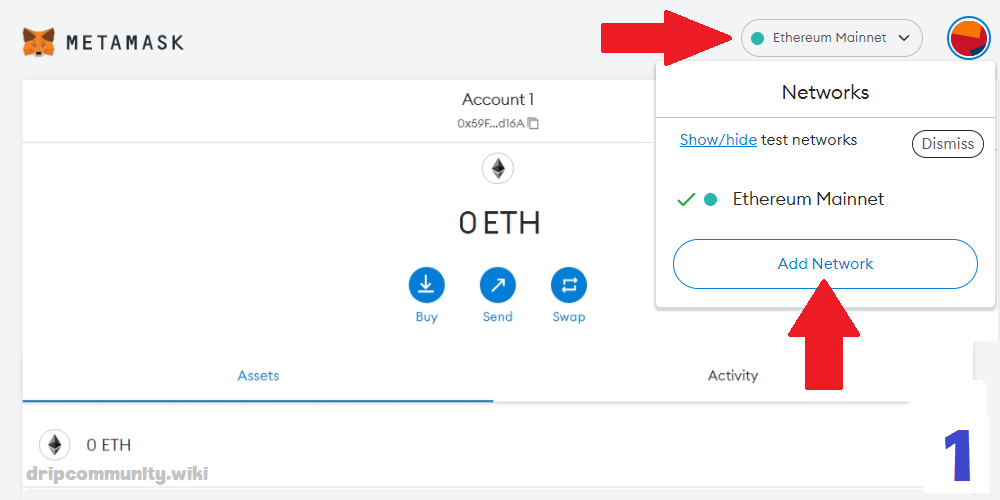
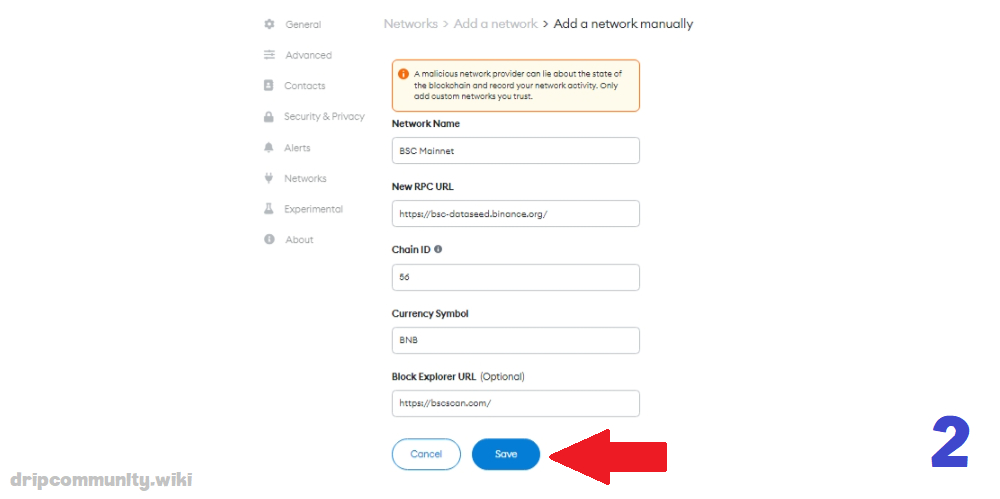
This is where you add the information to connect to the Binance Smart Chain.
Input the following new information and press save:
- Network Name: BSC Mainnet
- New RPC URL: https://bsc-dataseed.binance.org/
- ChainID: 56
- Symbol: BNB
- Block Explorer URL: https://bscscan.com
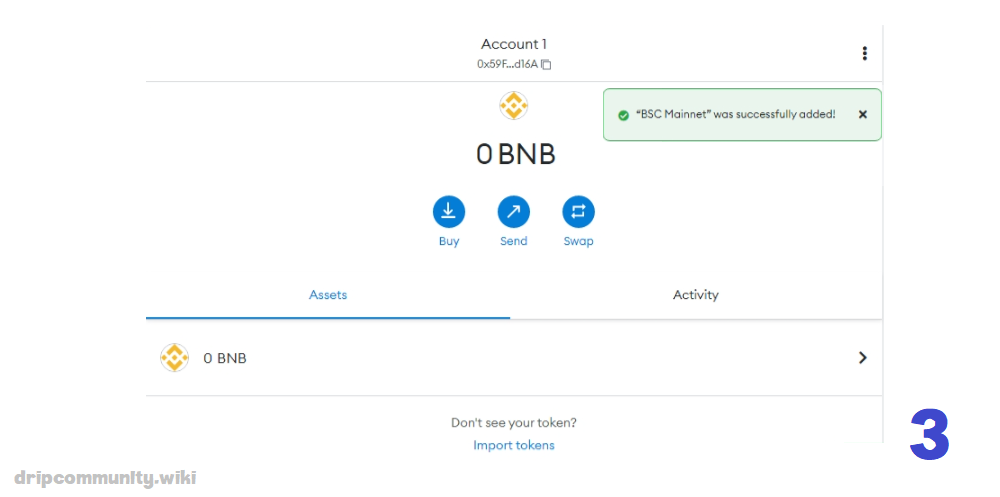
Once you Save the Network and return to the main view, you’ll notice two things: the network has automatically been set to the one you just entered, and the units are no longer denominated in ETH, but in BNB.
#
How to add a Token on MetaMask
To work with the Drip Community and Animal Farm protocols, we need to import the addresses of the tokens that are part of these protocols.
Read the step-by-step guide and learn how to import token on MetaMask.
Click on "Import Tokens" in the bottom center.

- This is the most important step because this is where you will add the information to import the token address to the Binance Smart Chain BEP20.
Check out the official address list:
Importing DRIP token.
- Token Contract Address:
0x20f663cea80face82acdfa3aae6862d246ce0333
- Token Symbol: DRIP
- Token decimal: 18 automatically filled
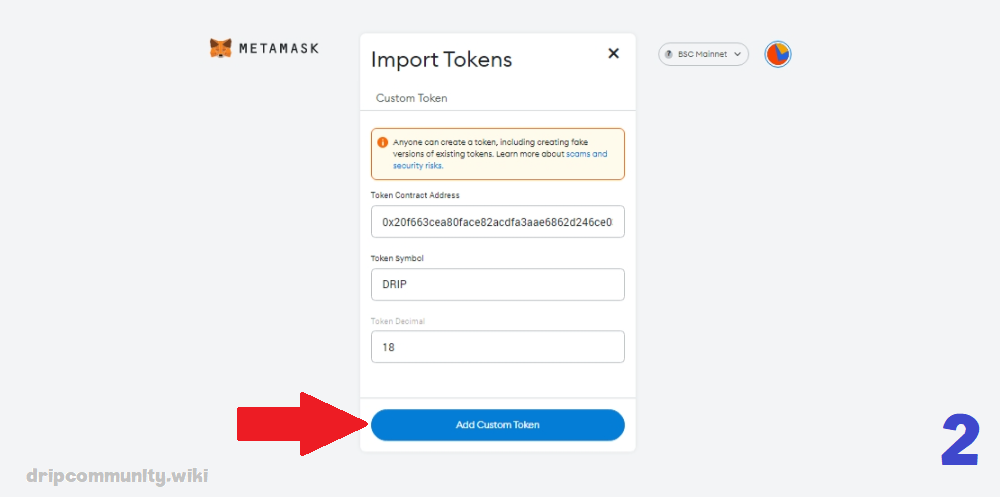
Click "Import Tokens" and now your custom token is added.
Your MetaMask wallet can now store/send/receive/exchange the specific token!
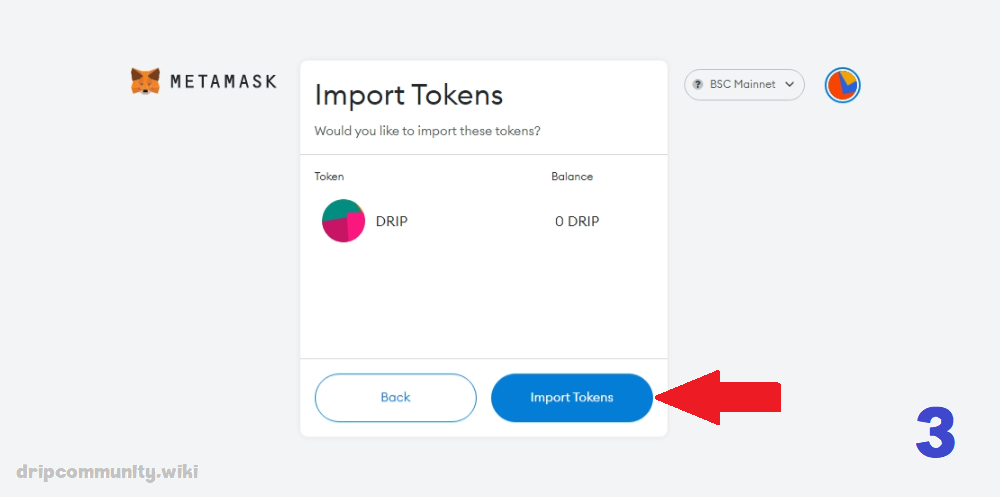
Repeat the same operation for all the tokens you intend to interact with.
#
How to transfer BNB into your wallet
This tutorial shows how to receive BSC BEP 20 tokens like BNB, with a MetaMask wallet.
This address can only accept assets on Binance Smart Chain BEP20. Sending other types of tokens to this address will result in a permanent loss.
- To find your account's address, just hover over the label for the selected account. In this case, "Account 1" which will let you copy the account's address to the clipboard.
Copy or share the wallet address, then you can start to receive crypto using the MetaMask wallet.
All tokens that are part of the Binance Smart Chain BEP20 have the exact same pubblic address.
#
Hardware Wallet
Hardware wallet keeps your private key protected at all times in a certified secure chip. Nobody can access it except you.
#
Ledger Nano S Plus
The Ledger Nano S plus provides a compromise between pricing and functionality. It is probably the best way to ensure your crypto transaction.
You can click confident in the following banner to purchase it in the safest way.

Any transaction must be verified on the device’s trusted display and physically confirmed by you.
- Signature, transfer, etc. initiated by you on dapp/online platform
- Transaction sent by MetaMask to Hardware Wallet
- Transaction signed on Hardware Wallet
- Signed transaction transferred back to MetaMask
- MetaMask sends signed transaction to the blockchain network
- Transaction is registered back at the dapp/platform.
#
How set up the Ledger hardware wallet
With your hardware wallet basically you have 2 choices, import your current wallet or create a new one.
Before you begin:
- Get your Ledger Nano S Plus
- Download and install Ledger Live.
#
Download Ledger Live
The first time you use the Ledger Live application, it will help you set up your Ledger device and configure the app. Ledger Live stores your accounts and settings on your computer.
Do not download Ledger Live from anywhere other than the official stores linked below.
- Navigate to ledger.com/ledger-live/download.
- Download the Ledger Live application.
- Double-click the Ledger Live executable file you downloaded.
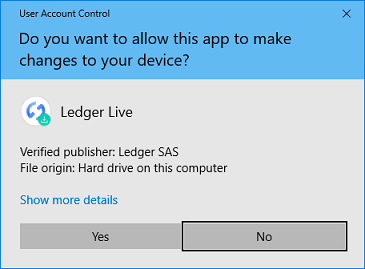
- If a warning displays, click Yes to allow the installation of Ledger Live.
- Once the installation completes, click Finish.
- Navigate to ledger.com/ledger-live/download.
- Download the Ledger Live application.
- Double-click the .dmg file you downloaded.
- Drag and drop the Ledger Live application to the Applications folder.
- Start Ledger Live from Launchpad or Spotlight.
- Click Open to allow the installation.
Once downloaded and installed the Ledger Live application continue with our setup.
#
Get started
- Start the Ledger Live application.
- On the welcome screen, click on Get started.
- Connect your device via usb.
- Select one of the two options below:
- Connect the Ledger Nano S to your computer using the supplied USB cable.
- Press the left or right button to navigate through the on-screen instructions.
- Press both buttons simultaneously to choose the option Set up as new device.
- Press both buttons when Choose PIN code is displayed on the device.
- Press the right or left button to choose the first digit of your PIN code.
- Press both buttons to enter a digit.
- Repeat the process until you've entered 4 to 8 digits.
- Select the checkmark (✓) and press both buttons to confirm the PIN code. Use the backspace icon to erase a digit.
- Confirm your PIN code by entering it once more.
Your 24-word recovery phrase will now be displayed word by word on the Ledger Nano S screen. The recovery phrase is the only backup of your private keys. It will be displayed only once.
- Take the blank Recovery sheet supplied in the box.
- Write down the first word (Word #1) on the Recovery sheet. Verify that you have copied it correctly in position 1.
- Press the right button to move to the second word (Word #2). Write it in position 2 on the Recovery sheet. Verify that you've copied it correctly. Repeat the process until the twenty-fourth word (Word #24).
- Press both buttons to Confirm your recovery phrase.
- Select the requested word by navigating with the left or right button. Validate the word by pressing both buttons. Repeat this step for each requested word.
- Your device have successfully completed the setup process.
- Connect the Ledger Nano S Plus to your computer using the supplied USB cable.
- Press the right button to navigate through the on-screen instructions.
- Press both buttons simultaneously to choose the option Restore from recovery phrase.
- Press both buttons when Choose PIN with 4 to 8 digits is displayed on the device.
- Press the right or left button to choose the first digit of your PIN code.
- Press both buttons to validate a digit.
- Repeat the process until you've entered 4 to 8 digits.
- Select (✓) to confirm your PIN code of 4 to 8 digits. Use the backspace icon to erase a digit.
- Confirm your PIN code by entering it once more.
- Choose the length of your recovery phrase (12, 18, or 24 words). Press both buttons to validate.
- Enter the first letters of Word #1 by selecting them with the right or left button. Press both buttons to validate each letter.
- Choose Word #1 from the suggested words. Press both buttons to validate it. repeat the process until the last word of your recovery phrase.
- Your device is ready is shown once you've successfully completed the setup process.
- Press both buttons for 3 seconds to open the Control Center.
#
Ledger Apps
You need to install apps on your Ledger device to manage different crypto assets. Install the Binance Smart Chain app to manage BNB accounts via Ledger Live software.
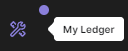
- Click on the My Ledger in the left panel.
- Connect and unlock your Ledger device.
- Press both buttons to allow My Ledger on your device.
My Ledger will show your device information as well as the App catalog and the Installed apps below it.
- Search for the Binance Smart Chain BEP20 in the App catalog.
- Click the Install button of the app. Your device will display Processing.
- The app will be installed on your device.
- Wait for the installations to finish before you quit My Ledger.
#
The dummy wallet
Once you have restored your wallet to the Ledger hardware, remove your old MetaMask extension and install a new one that you will use to integrate and connect with your Ledger.
The next step, whether you imported a wallet or created a new one, is to set up a new MetaMask wallet that you will use only to connect to your Ledger.
Its only purpose is to access the MetaMask configuration to connect Ledger hardware.
- Create the new "Dummy Wallet" and name it "DO NOT USE".
#
How to access your Ledger account via MetaMask
Each transaction must be verified on the device’s trusted display and physically confirmed by you.
- Plug your Ledger device into your computer and open the Binance Smart Chain app on your device and pressing both buttons simultaneously. Your Ledger device displays Application is ready.
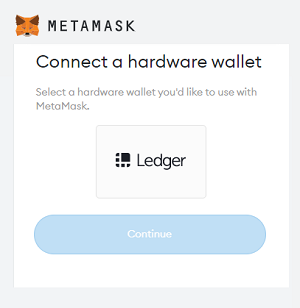
- In MetaMask, click the identicon, select Connect Hardware Wallet > Ledger, and click Continue. After a brief moment, a list of account addresses appears.
- Select an account by ticking the box. Then click Unlock. Your Ledger Binance Smart Chain account and BNB balance appear in MetaMask.
#
Troubleshooting
Troubleshooting UNKNOWN _ERROR (0x650f) that can occur when connecting a ledger device to MetaMask.

- In case it is open, close Ledger Live.
- In MetaMask, go to Settings > Advanced, scroll down to Preferred Ledger Connection Type, and select WebHID.
- Make sure that your Ledger device is unlocked and not on screen saver.
- Open the BNB app on your Ledger device by navigating to the BNB icon and pressing both buttons simultaneously.
- Your device displays: Application is ready.
- In MetaMask, go to Settings > Connect Hardware Wallet, select Ledger and click Continue to attempt the connection again.